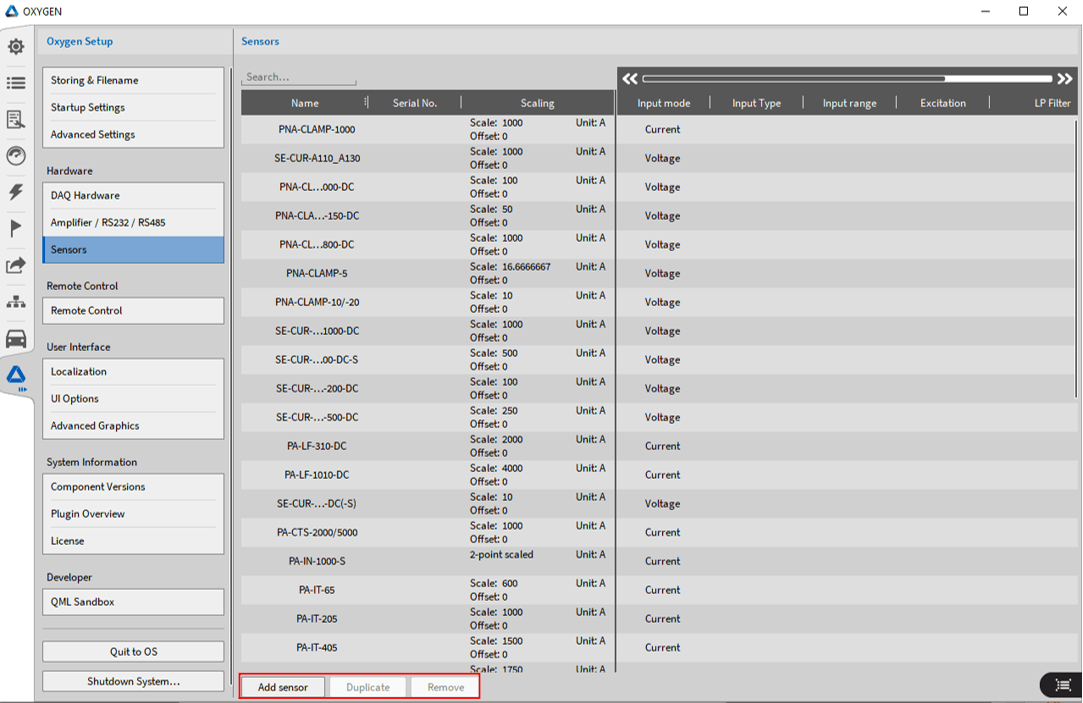
DWC OXYGEN supports inputting sensor information (sensitivity, excitation voltage, filtering, offset, etc.) used by all users into the sensor library

Fig. 6.10: Sensor Library
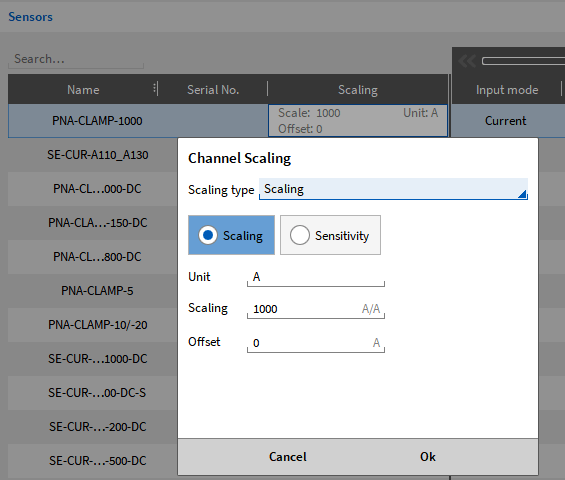
The sensor library can be found in the system settings, and the interface is friendly and convenient for setting and accessing. To add a new sensor, click the "Add Sensor" button at the lower left corner (in the red box in Figure 6.10) The sensor attributes are the same, and can also be set in the channel (see Changing the channel settings for details) By clicking properties, a small pop-up window will appear, as shown in Figure 6.11, the following parameters can be edited:
• Name: Sensor name • Serial number: Add sensor serial number
• Billy coefficient: add Billy coefficient, sensitivity method, two-point method, table method
• Measurement input attributes (determined by the sensor itself)
– Input mode: define the input mode required by the sensor; Select voltage, current, bridge, resistance, potentiometer, temperature and IEPE
– Input Type: defines the input type (different input methods, different input types).
– Input range range: defines the input range (different input methods have different input ranges).
– Excitation: select excitation (off, voltage, current) and corresponding values – low-pass filter: add optional low-pass filter, define frequency, order (2,4,6,8) and type (Bessel or Butterworth)
– Coupling: Select coupling mode
– Some other attributes

To copy or delete a sensor, just click the corresponding sensor and mark the copy or delete button in red as shown in Figure 6.10 Click+Advanced (see Figure 6.12) to open the advanced menu in the parameter bar, and more attributes can be added:
• Bridge resistance
• Bridge sensor offset
• Target resistance of bridge circuit
• Bypass resistance
• RTD sensor type
To apply a sensor to a channel, perform the following steps:
• Access channel settings by clicking the pinion of a single channel in the channel list
• Click the Select Sensor button in the upper right corner
• A pop-up window will appear showing a list of all defined sensors refer to Figure 6.14
• Select the desired sensor and click OK. The search field simplifies the search for a specific sensor in the list.
• Sensor parameters will be applied to the channel. This can be identified by the name of the sensor, which will be displayed in the channel settings and channels, refer to Figure 6.15
• To delete the applied sensor from the channel, simply click the X button next to the sensor name in the channel settings (see Figure 6.15)
Note:
• Only sensors with analog signals support sensor library entry (encoder type is not allowed)
• When the database is changed, the sensors on the allocated channel will not be automatically updated and must be reassigned.
• An. xml file will be created with sensor information, which can also be edited externally in third-party software. The xml file name is "sensor_db. xml", and the path is as follows: user, public, public document, DEWETRON, OXYGEN


